この snips.ai の音声処理(エコーキャンセル、ノイズ削減、ビームフォーミング等)デバイスとして、XMOS社 VocalFusion スピーカー開発キット を使用することが可能です。これにより、よりクリアな音声を snips.ai に入力することができます。
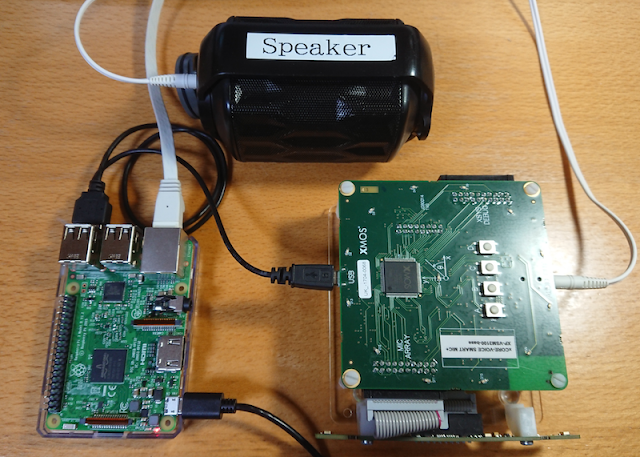
以下では、Raspberry Pi 3 (RPi3 Model B) 上で動作する snips.ai と、XMOS社VocalFusion スピーカー開発キット (XK-VF3100-L33)を組み合わせた Voice Assistant のセットアップについてご紹介します。

※
下記の設定のうち、snips の設定部分は、次のURLに記載がありますので、合わせてご確認ください。
Getting Started with Snips on Raspberry Pi
https://snips.gitbook.io/getting-started/
USB インターフェースのファームウエアを書き込みます(前述の写真・ボードでは、ファームウエア・ファイル app_vf_spk_base_1i1o2_lin33_asr.xe を使用)。
書き込み方法の資料や及びファームウェア・ファイルについては、XMOSの Web site からダウンロードできます。
xCORE VocalFusion™ Speaker Evaluation Kit Quick Start Guide
Getting Started with Snips on Raspberry Pi
https://snips.gitbook.io/getting-started/
(1)XMOS VocalFusion スピーカー開発キット (XK-VF3100-L33)設定
USB インターフェースのファームウエアを書き込みます(前述の写真・ボードでは、ファームウエア・ファイル app_vf_spk_base_1i1o2_lin33_asr.xe を使用)。
書き込み方法の資料や及びファームウェア・ファイルについては、XMOSの Web site からダウンロードできます。
xCORE VocalFusion™ Speaker Evaluation Kit Quick Start Guide
(XMOS社の日本代理店は株式会社マクニカになります。XMOS社の評価ボードは、こちらからもご注文いただけます。 http://www.tecstar.macnica.co.jp/products/xmos.html)
snips.ai
https://makers.snips.ai/
"Add a skill" をクリック後、(今回のテストのために)"Greetings" という既存の skill を追加します。
この skill は、挨拶を返す簡単なものです。2つの Intents が定義されています。"bye" と "hello" です。以下は、Greetings をクリックして、"Edit skill" -> "Fork" とクリックすると確認できました。
"bye" intent では、以下が定義されています。テストでは、"bye robot" と発言してみます。
また、Actions では、以下のように定義されています。"bye" intents に一致する言葉を認識した場合には、以下のうち、いづれかを返答するように設定されています。
"bye", "see you later", "good bye", "bye now"
4GB or 8GB SDカードに、Raspbian のイメージ・ファイルをインストールします。
以下では、macOS での操作を記載しています。
ディスク・ユーティリティで、"disk?" 番号を確認します。
以下では、「装置」箇所に、"disk2s1" と表示されています。この番号を記録しておきます。
また、ディスク・ユーティリティ Window の、上部に「マウント解除」ボタンがあります。
左側に表示されるデバイス一覧から、SDカードを選択後、「マウント解除」ボタンをクリックします。

その後、ダウンロードした Raspbian のイメージ・ファイルを、Terminal から、以下のコマンドでSDカードに書き込みます。
このとき、先ほど確認した "disk?" の番号を入力します。以下では、"rdisk2" と設定しています。
$ sudo dd bs=1m if=2018-04-18-raspbian-stretch-lite.img of=/dev/rdisk2 conv=sync
SDカードへの書き込み後、SDカードを Raspberry Pi 3 に挿入し、電源を入れます。
その後、その後の操作のために、いくつか設定を行います(下記)。
Raspberry Pi 上で、raspi-config コマンドを使用して、SSHを有効にします。また、キーボードに合わせて設定を行ってください。以下では、SSHの有効化の手順を記載します。
$ sudo raspi-config
=> 5 Interfacing Options Configure connections to peripherals
を選択
=> P2 SSH Enable/Disable remote command line access to your Pi using SSH
を選択
その後、SSH を Enable にする
Rasbperry Pi と XMOS社VocalFusion スピーカー開発キット (XK-VF3100-L33)は、I2S インターフェースまたは、USB Audio で通信することができます。
今回は、Raspberry Pi 側の設定が簡単な USB Audio で接続します。Raspberry Pi 側の Audio 設定も、以下の手順で USB Audio に設定します。
「/etc/modprobe.d/alsa-base.conf」を作成。ファイルには次の2行のみ記載する。
macOS の Terminal 上で、以下のコマンドを実行します。
$ /usr/bin/ruby -e "$(curl -fsSL https://raw.githubusercontent.com/Homebrew/install/master/install)"
$ brew install node
$ sudo npm install -g n
$ sudo npm update -g npm
$ sudo n lts
前述の写真のように、USBケーブルで、Raspberry Pi と接続します。
また、スピーカーを、VocalFusion スピーカー開発キット (XK-VF3100-L33) の Audio Out に接続します。
以下の操作は全て macOS 側での操作になります。
この操作の前に、Raspberry Pi に Ethernet ケーブルを接続します。
$ sudo npm install -g snips-sam
$ sam devices
Scanning Raspberry Pi devices on the network...
$ sam init
$ sam test speaker
(2)snips.ai 側の設定
(2ー1)snips.ai アカウントの設定
画面右上の"Sign Up" をクリックして、アカウントを作成します。snips.ai

https://makers.snips.ai/

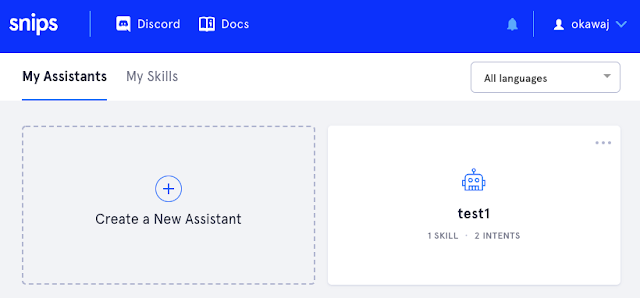
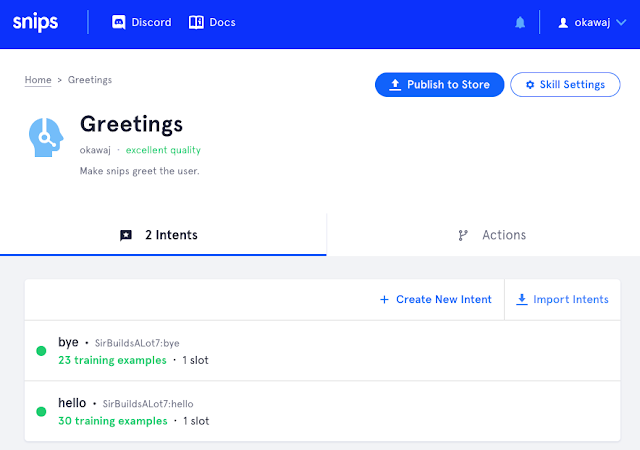
(2ー2)snips.ai アシスタントの作成
以下では、"test1" という Assistant を作成した例です。
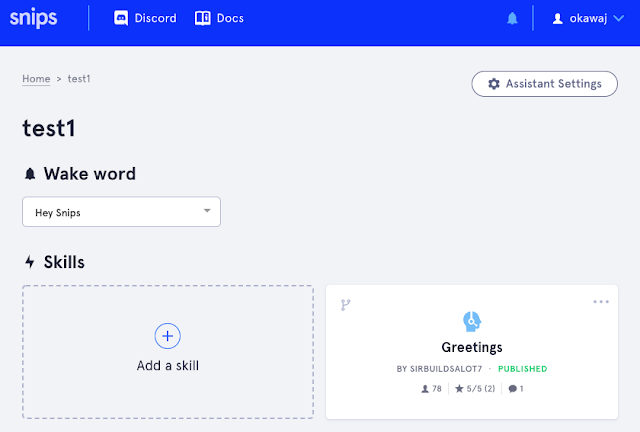
"Add a skill" をクリック後、(今回のテストのために)"Greetings" という既存の skill を追加します。

この skill は、挨拶を返す簡単なものです。2つの Intents が定義されています。"bye" と "hello" です。以下は、Greetings をクリックして、"Edit skill" -> "Fork" とクリックすると確認できました。

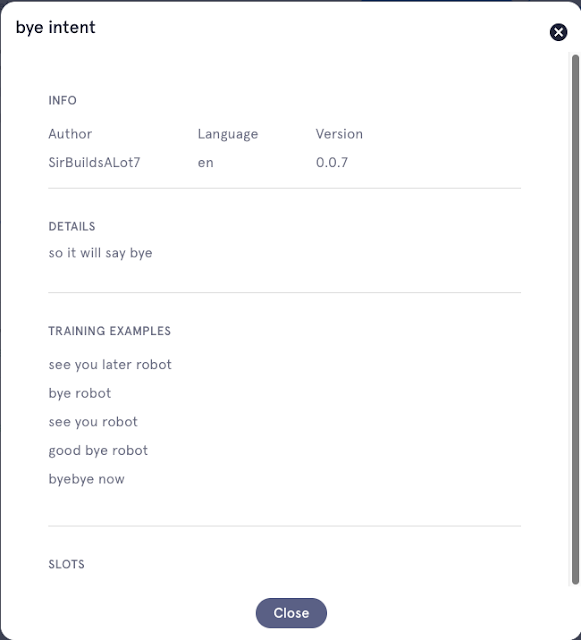
"bye" intent では、以下が定義されています。テストでは、"bye robot" と発言してみます。

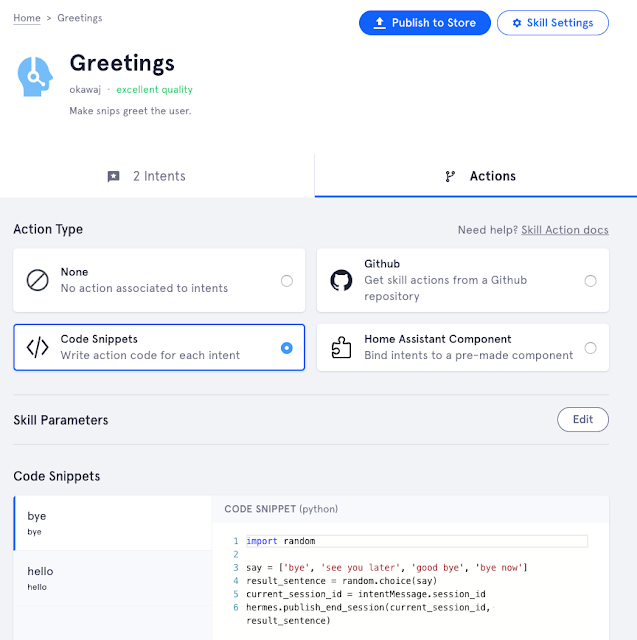
また、Actions では、以下のように定義されています。"bye" intents に一致する言葉を認識した場合には、以下のうち、いづれかを返答するように設定されています。
"bye", "see you later", "good bye", "bye now"

(3)Raspberry Pi の設定
(3−1) Raspbian のダウンロード (Raspbian Stretch Lite)
以下のURLより、Raspbian Stretch Lite をダウンロードします。
https://www.raspberrypi.org/downloads/raspbian/(3−2)Rasbian のインストール
4GB or 8GB SDカードに、Raspbian のイメージ・ファイルをインストールします。
以下では、macOS での操作を記載しています。
ディスク・ユーティリティで、"disk?" 番号を確認します。
以下では、「装置」箇所に、"disk2s1" と表示されています。この番号を記録しておきます。
また、ディスク・ユーティリティ Window の、上部に「マウント解除」ボタンがあります。
左側に表示されるデバイス一覧から、SDカードを選択後、「マウント解除」ボタンをクリックします。

その後、ダウンロードした Raspbian のイメージ・ファイルを、Terminal から、以下のコマンドでSDカードに書き込みます。
このとき、先ほど確認した "disk?" の番号を入力します。以下では、"rdisk2" と設定しています。
$ sudo dd bs=1m if=2018-04-18-raspbian-stretch-lite.img of=/dev/rdisk2 conv=sync
SDカードへの書き込み後、SDカードを Raspberry Pi 3 に挿入し、電源を入れます。
その後、その後の操作のために、いくつか設定を行います(下記)。
(3−3)SSH 有効化とキーボード等の設定
Raspberry Pi 上で、raspi-config コマンドを使用して、SSHを有効にします。また、キーボードに合わせて設定を行ってください。以下では、SSHの有効化の手順を記載します。
$ sudo raspi-config
=> 5 Interfacing Options Configure connections to peripherals
を選択
=> P2 SSH Enable/Disable remote command line access to your Pi using SSH
を選択
その後、SSH を Enable にする
(3−4)USB Audio の有効化
Rasbperry Pi と XMOS社VocalFusion スピーカー開発キット (XK-VF3100-L33)は、I2S インターフェースまたは、USB Audio で通信することができます。
今回は、Raspberry Pi 側の設定が簡単な USB Audio で接続します。Raspberry Pi 側の Audio 設定も、以下の手順で USB Audio に設定します。
「/etc/modprobe.d/alsa-base.conf」を作成。ファイルには次の2行のみ記載する。
options snd slots=snd_usb_audio
options snd_usb_audio index=0
「/usr/share/alsa/alsa.conf」の一行をコメントアウトする(赤字の部分)。
@hooks [
   {
      func load
      files [
         {
            @func concat
            strings [
               { @func datadir }
               "/alsa.conf.d/"
            ]
         }
         "/etc/asound.conf"
#         "~/.asoundrc"
      ]
      errors false
   }
]
「/boot/config.txt」 内で、BCM 2835 を有効にしている部分を、"off" に設定(赤字の部分)
#Enable audio (loads snd_bcm2835)
dtparam=audio=off
(4)macOS側の設定
(4−1)Homebrew のインストール
macOS の Terminal 上で、以下のコマンドを実行します。
$ /usr/bin/ruby -e "$(curl -fsSL https://raw.githubusercontent.com/Homebrew/install/master/install)"
(4−2)node.js のインストール
macOS の Terminal 上で、以下のコマンドを実行します。
$ sudo npm install -g n
$ sudo npm update -g npm
$ sudo n lts
(5)XMOS社 VocalFusion スピーカー開発キット (XK-VF3100-L33) との接続
前述の写真のように、USBケーブルで、Raspberry Pi と接続します。
また、スピーカーを、VocalFusion スピーカー開発キット (XK-VF3100-L33) の Audio Out に接続します。
(6)snips.ai のインストール
以下の操作は全て macOS 側での操作になります。
この操作の前に、Raspberry Pi に Ethernet ケーブルを接続します。
$ sudo npm install -g snips-sam
$ sam devices
Scanning Raspberry Pi devices on the network...
Found 1 device:
- raspberrypi (192.168.9.2)
(ping 192.168.9.2 と入力後、sam devices コマンドで見えた)
$ sam connect raspberrypi.local
(ping 192.168.9.2 と入力後、sam devices コマンドで見えた)
$ sam connect raspberrypi.local
? Enter username for the device: pi
? Enter password for the device: [hidden]
Connected to raspberrypi.local
Installing Snips Platform components. This may take a few minutes...
Successfully installed Snips Platform components
$ sam status
Connected to device raspberrypi.local
OS version ................... Raspbian GNU/Linux 9 (stretch)
Installed assistant .......... Not installed
Status ....................... Installed, not running
Service status:
snips-analytics .............. 0.55.2 (not running)
snips-asr .................... 0.55.2 (not running)
snips-audio-server ........... 0.55.2 (running)
snips-dialogue ............... 0.55.2 (not running)
snips-hotword ................ 0.55.2 (not running)
snips-nlu .................... 0.55.2 (not running)
snips-skill-server ........... 0.55.2 (not running)
snips-tts .................... 0.55.2 (running)
$ sam test microphone
Testing microphone
Say something in the microphone, then press Enter... ...
$ sam login
$ sam watch
(以下は、"Hey snips, good bye robot" と発音した際のログです)
以下を発音すると何か返答します。
"Hey snips (ヘイ、スニプス)、 Hello (ハロー)"
"Hey snips (ヘイ、スニプス)、 Bye (バイ)"
これで、snips.ai と XMOS VocalFusion スピーカー開発キット (XK-VF3100-L33)を使用した開発環境が構築できました。
Snips のコンソール上で、Skill を追加し、また、この環境を使用することで、遠くから(ファーフィールド)の音声もしっかりキャプチャできる、オリジナルの Voice Assistant を構築できることがお分りいただけたと思います。
(Assistant を更新した場合や、切り替える場合には、前述の「sam install assistant 」を再度実行してください)
(その他の投稿については、右上の「ページ」をご確認ください)
Say something in the microphone, then press Enter... ...
$ sam login
? Enter email used on the console: username@mail.com
? Enter password used on the console: [hidden]
$ sam install assistant
$ sam install assistant
Fetching assistants done
Found 1 assistant named test1
Downloading assistant
Fetching assistants done
NLU training done
ASR training done
✔ Deploying assistant to raspberrypi.local...
Checking for skills
i Found 1 skill
Generating actions based on the snippets provided
INFO:snips_actions_templates_engine_lib: parsing snippets for skill "/usr/share/snips/assistant/snippets/SirBuildsALot7.Greetings"
INFO:snips_actions_templates_engine_lib: parsing snippets dir "/usr/share/snips/assistant/snippets/SirBuildsALot7.Greetings/python2"
INFO:snips_actions_templates_engine_lib: parsed 2 snippets
Setting up Python actions
✔ Installing pip and virtualenv. This could take a while.
Checking actions for end-user parameters
✔ Generating virtual environment for python actions
Relaunching snips-skill-server
✔ Snips assistant is now running. Say hey_snips to start!
i Run sam watch to see the logs
$ sam watch
(以下は、"Hey snips, good bye robot" と発音した際のログです)
[10:22:22] Watching on localhost:1883 (MQTT)
[10:22:44] [Hotword] detected on site default, for model default
[10:22:44] [Asr] was asked to stop listening on site default
[10:22:44] [Hotword] was asked to toggle itself 'off' on site default
[10:22:44] [Dialogue] session with id '5857e34d-cfcc-4f15-9d6a-6d62ac40b1a3' was started on site default
[10:22:44] [Asr] was asked to listen on site default
[10:22:48] [Asr] captured text "good bye robot" in 3.0s
[10:22:48] [Asr] was asked to stop listening on site default
[10:22:48] [Nlu] was asked to parse input good bye robot
[10:22:48] [Nlu] detected intent SirBuildsALot7:bye with probability 1.000 for input "good bye robot"
Slots ->
bye -> good
bye -> bye
[10:22:48] [Dialogue] New intent detected SirBuildsALot7:bye with probability 1.000
Slots ->
bye -> good
bye -> bye
[10:22:48] [Dialogue] was ask to end session with id 5857e34d-cfcc-4f15-9d6a-6d62ac40b1a3 by saying 'good bye'
[10:22:48] [Tts] was asked to say "good bye"
[10:22:48] [AudioServer] was asked to play a wav of 28.4 kB with id '861b50fa-2c9f-4047-becd-e9621c8c9ca6' on site default
[10:22:49] [AudioServer] finished playing wav with id '861b50fa-2c9f-4047-becd-e9621c8c9ca6'
[10:22:49] [Tts] finished speaking with id '01984692-11e1-4ded-b38e-ba92d9d820ea'
[10:22:49] [Dialogue] session with id '5857e34d-cfcc-4f15-9d6a-6d62ac40b1a3' was ended on site default. The session ended as expected
[10:22:49] [Asr] was asked to stop listening on site default
[10:22:49] [Hotword] was asked to toggle itself 'on' on site default
(7)snips.ai とVocalFusion スピーカー開発キット (XK-VF3100-L33)の動作確認
以下を発音すると何か返答します。
"Hey snips (ヘイ、スニプス)、 Hello (ハロー)"
"Hey snips (ヘイ、スニプス)、 Bye (バイ)"
これで、snips.ai と XMOS VocalFusion スピーカー開発キット (XK-VF3100-L33)を使用した開発環境が構築できました。
Snips のコンソール上で、Skill を追加し、また、この環境を使用することで、遠くから(ファーフィールド)の音声もしっかりキャプチャできる、オリジナルの Voice Assistant を構築できることがお分りいただけたと思います。
(Assistant を更新した場合や、切り替える場合には、前述の「sam install assistant 」を再度実行してください)
(その他の投稿については、右上の「ページ」をご確認ください)
0 件のコメント:
コメントを投稿